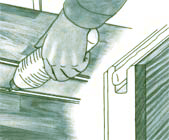
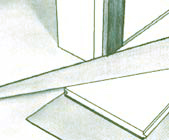
Getting That Starting Line Snapped
You won't find many rooms or houses that are truly square. It's not uncommon to have differences
of 3/8" and more from one side of a room to another. To offset the difference, always think which is the main visual point.
Start your layout square to that particular wall or make adjustments where the differences will hide under baseboard or other
trim used. Out of square is not an issue if the flooring runs perpendicular to that area. A parallel wall lines to the flooring
direction is where we need to be square.
Many specifications will suggest starting your hardwood installation from the longest exterior
wall. However we realize this will not be the case at all times especially for those installing a few rooms. |
It's a wise idea to check how far out of square it may be before you start. Using a tape
measure get a measurement from two opposite wall lines and compare the two numbers. Depending on the width of the material,
our starting area should be 30-36" from the baseboard or drywall. In our example we're using a 3 1/4" width engineered product. We've multiplied
11 x 3.25 and added 3/8" for our expansion space that will be covered with shoe molding after the floor is laid.
should be 30-36" from the baseboard or drywall. In our example we're using a 3 1/4" width engineered product. We've multiplied
11 x 3.25 and added 3/8" for our expansion space that will be covered with shoe molding after the floor is laid.
Expansion isn't as critical with glued engineered products as it is with floating floors or nail
downs, but you will need some area to get those last few rows into place.
 Not all products are created equal. We suggest placing ten boards together checking for size. Where it may be 3" in width,
ten boards may not equal 30" This is common with lower quality products as the milling is not as refined. It may be a good
idea to add another 1/4" on top of our example of 36 1/8" Otherwise you may find yourself having to cut a smidgeon off with
the last board to fit the parallel wall area.
Not all products are created equal. We suggest placing ten boards together checking for size. Where it may be 3" in width,
ten boards may not equal 30" This is common with lower quality products as the milling is not as refined. It may be a good
idea to add another 1/4" on top of our example of 36 1/8" Otherwise you may find yourself having to cut a smidgeon off with
the last board to fit the parallel wall area.
Having marked two areas from our base on each side of the working area, snap a chalk line. This will become our starting line. In
this case our helper was nowhere to be found so a full bucket of Bostiks did the trick. Once we have our starting line, double
check how it looks on the opposite wall with the tape measure. It's also a good idea to check against the starter wall area
as some walls or base may not be straight.
marked two areas from our base on each side of the working area, snap a chalk line. This will become our starting line. In
this case our helper was nowhere to be found so a full bucket of Bostiks did the trick. Once we have our starting line, double
check how it looks on the opposite wall with the tape measure. It's also a good idea to check against the starter wall area
as some walls or base may not be straight.
Oh, did we mention sweeping the areas first? Another contributing factor in glue down failures
includes dust and dirt. For best results we recommend sweeping and vacuuming the areas prior to anything. Keep your working
area clean and organized. Hardwood flooring will ding and scratch. All it takes is one careless person walking over
the tools and you have dings in your brand new floor.
Getting That First Area Laid |
The starting area is the most important in any installation. If we're looking
at a single room, the biggest concern is how square you are in that area. However, if the installation goes into other areas
and your starting line is out of square to these areas you'll find yourself correcting as you go along. This is why we recommend
a control line.
A control line is the reference point for the entire layout and should be utilized near the center.
In this case find the longest parallel wall and set a chalk line halfway across the room or nearer to the center of the entire
installation. From here we recommend making reference points in other areas checking to see how square we may be from our
control line. Another word, measure away from the control line and get another chalk line set. Check measurements against
all parallel wall lines and make necessary adjustments.
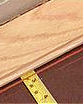
Back to the starting area. Measuring out 36 1/8" from our base we've snapped our starter line.
Once the adhesive is spread we're ready to work off that line and towards the baseboard. 36 1/8" in this example equals 11 boards
at 3 1/4" each--plus 3/8" for the base or molding to cover.
adhesive is spread we're ready to work off that line and towards the baseboard. 36 1/8" in this example equals 11 boards
at 3 1/4" each--plus 3/8" for the base or molding to cover.
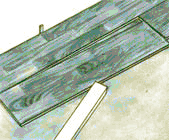
Place your first row directly on the chalk line, proceeding to add a few more rows staggered as
much as possible as shown in the image to the left. Once you have a few rows started use some scrap pieces to be used as backer
boards to keep the installation from moving around in the adhesive. Attach them with concrete cuts nails, preferably smaller
ones or 3 1/2 penny.
Working from left to right continue to fill in the area where the adhesive had been applied. Don't
forget about that can of mineral spirits and a rag. Your first experience with this adhesive will not be a treat and it's
important to cleanup as you go.
Depending on how well you've spread the adhesive you may get some ooze over the starting line.
When spreading try to keep the adhesive 1/4" away from the line. If you should happen to stop for a day or two, make sure
the area and the groove is clean of any excessive glue.
 Trying to engage the next row with a dried glue clog can be a frustrating experience. Always check before spreading any additional
adhesive. Pictured is an example of some dried adhesive that had to be cleaned in order to continue. Otherwise you will not
get a tight fit of the old area to the new and gapping will be inevitable.
Trying to engage the next row with a dried glue clog can be a frustrating experience. Always check before spreading any additional
adhesive. Pictured is an example of some dried adhesive that had to be cleaned in order to continue. Otherwise you will not
get a tight fit of the old area to the new and gapping will be inevitable.
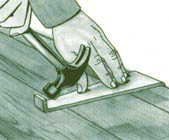
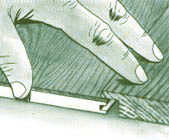
If we've measured correctly, our last row should fit in nicely with about 3/8' left. Depending
on the product quality it may be tight. Place the last full piece while utilizing a pry bar against the base or wall to pull
the installation tight. Insert wedges into the area to keep the tight fit as shown below. At this point your starting area should be tight as a drum and should not slide out of place. However, keep a close eye on
end joints for a few hours as they have a tendency to open up at will.
At this point your starting area should be tight as a drum and should not slide out of place. However, keep a close eye on
end joints for a few hours as they have a tendency to open up at will.
Wedges can be made from scrap pieces on the power miter saw you are using. We would suggest
using a piece of cardboard behind the pry bar to prevent damage to the baseboard when prying.
Once you've completed the starting area, go over it thoroughly with a rag and mineral
spirits. There's nothing more frustrating then having to clean cured urethane adhesive once the job is complete. In this particular
job, you need to be attention to cleaning as you go, spend few hours on cleaning spots that you missed
or glue that got tracked from one spot of ooze to another.
Continuing the Installation |
Once our starting area is complete remove our starter boards very carefully and measure
out another area to be worked. Use whatever measurement you find more comfortable. 24, 30, or 36"(based on 3" width) away
from the original starter line. Get another chalk line going and spread the adhesive again.
|
Knee Pads and Other Stuff |
Obtain padded cloth types. Those with plastic caps will scratch your new hardwood floors. It's
also a good idea to shake out any grit that may have been collected each time you put them on. Guys, all it takes is one piece
of grit caught on a knee pad and you may be sleeping on the couch the next few days.
Do you know how messy this adhesive is? By all means use your worst clothes and keep
them separated from others when you're through with them for the day. You maybe think.."If this stuff is that messy, why don't
I wear gloves?" Not that professionals have tried it, some may consider using types used in restaurants or hospitals.
Forget the heavy bulky ones, as your fingers will be millimeters from the adhesive at all times when laying.
What Kind of Trowel- Cleaning
Tips
Trowels. Always follow the recommended specs by manufacturers. Typically for engineered glue downs,
V notched trowels are suggested, but square notched ones as well, providing adequate coverage is followed. If you're not sure,
measure how much area you've laid and divide by the number of gallons used. 45 square feet per gallon would be a safe range
to stay within, but some manufacturers vary.
Sorry for hawking on this preparedness issue, but you'll find it will make your job much easier.
If your installation extends over a period of a few days or weeks here's a neat tip in keeping the trowel clean. Duct tape
the undersides before you begin, keeping away from the notches. At the end of the day clean as much as possible from the trowel.
The following day all you'll need to do is rip the tape off and you're pretty much ready to go. However, you will have to
clean the teeth from dried adhesive
Spreading the Adhesive
Alright then it looks like you're ready for that big moment. Now comes the fun part; getting
that adhesive on the floor without making a major mess. With Bostiks there's a good chance once you open the container there will be a
small film on top that cannot be used. It must be removed otherwise it causes clumping. Do so with a scrap piece of wood in
the area you plan to spread. Remember, this stuff loves to ooze. Keep a scrap piece of cardboard next to the container
where you can place the stuff once removed from the five gallon container.
on the floor without making a major mess. With Bostiks there's a good chance once you open the container there will be a
small film on top that cannot be used. It must be removed otherwise it causes clumping. Do so with a scrap piece of wood in
the area you plan to spread. Remember, this stuff loves to ooze. Keep a scrap piece of cardboard next to the container
where you can place the stuff once removed from the five gallon container.
 Tilt the container allowing the adhesive to spill out. Careful--go slowly otherwise you'll have more than you want. Pour an
amount, or one third that you'll need in the working area at one end. Having more than necessary can be difficult to spread
as the adhesive is very thick in consistency. Use the trowel to stop the flow as shown in the image to the left. Move the
glue bucket behind you in the working area or place it on a piece of cardboard out of the working area.
Tilt the container allowing the adhesive to spill out. Careful--go slowly otherwise you'll have more than you want. Pour an
amount, or one third that you'll need in the working area at one end. Having more than necessary can be difficult to spread
as the adhesive is very thick in consistency. Use the trowel to stop the flow as shown in the image to the left. Move the
glue bucket behind you in the working area or place it on a piece of cardboard out of the working area.
It's important to spread the adhesive in a consistent manner trying to avoiding misses and clumps or pools of adhesive. Not enough adhesive is another cause of failure with these types
of installations. Having too much will cause problems when laying. Adhesive will squeeze between the boards, creating a cleanup
chore you want to avoid.
trying to avoiding misses and clumps or pools of adhesive. Not enough adhesive is another cause of failure with these types
of installations. Having too much will cause problems when laying. Adhesive will squeeze between the boards, creating a cleanup
chore you want to avoid.
Keep an eye on your working area. Clean any boo-boos immediately, including adhesive that may get on the
baseboard or outside the working area.
Dry Laying- Fitting Around Obstacles
 If your installation runs into different areas other than one square room, fitting around door casings and the like should
be done before you spread the adhesive. Termed dry-lay by professionals, will prevent a lot of glue from getting
into places you'd rather not want. This includes power tools. How frustrating it can be trying 3,4 and five times to get that
one piece to fit right with glue all over the place.
If your installation runs into different areas other than one square room, fitting around door casings and the like should
be done before you spread the adhesive. Termed dry-lay by professionals, will prevent a lot of glue from getting
into places you'd rather not want. This includes power tools. How frustrating it can be trying 3,4 and five times to get that
one piece to fit right with glue all over the place.
We suggest planning ahead on the installation. Normally you'll want to spread enough adhesive that
can be covered in an hour or so. This doesn't mean you have to do 30" or 36" areas all the time. If you're nearing an area that
looks like a lot of intrigue cuts will be involved, measure and snap the chalk line a few boards short of that area and complete.
At this time cut and dry lay the new areas. Once you have the desired fit, remove in an organized fashion (so you know what
order to place them back) and proceed with trawling new adhesive in that area.
be covered in an hour or so. This doesn't mean you have to do 30" or 36" areas all the time. If you're nearing an area that
looks like a lot of intrigue cuts will be involved, measure and snap the chalk line a few boards short of that area and complete.
At this time cut and dry lay the new areas. Once you have the desired fit, remove in an organized fashion (so you know what
order to place them back) and proceed with trawling new adhesive in that area.
In one example, some area came two board widths shy of this floor outlet. Using
a comparable template to cut around the floor outlet, we dry laid it, removed the pieces, spread the adhesive and continued.
In this case the outlet was in the middle of the room. In this case the first four rows of the new area started around
the outlet. Work right and left instead of laying four complete rows across the room.
Keeping the Installation Tight-Minimize Gapping
 Most DIY installations are obvious when looked at by a professional that does it everyday. A few very useful tips that will
put you in their camp are how to install a tight floor and stagger the boards properly. Unfortunately some products may
be milled so poorly our efforts may seem meaningless but we'll do our best.
Most DIY installations are obvious when looked at by a professional that does it everyday. A few very useful tips that will
put you in their camp are how to install a tight floor and stagger the boards properly. Unfortunately some products may
be milled so poorly our efforts may seem meaningless but we'll do our best.
Staggering should be considered at all times. Don't be distracted as it will happen once you start
chewing the fat with your helper. Try not to repeat the location of end joints in the installation and keep adjacent joints
as far apart as possible.
If possible don't work on a newly completed area until it the adhesive has had a chance to grab.
This can take upwards of a few hours and more. Shifting weight and walking on completed areas will open up side and
end joints unless you have the privilege of working with products that stay together more than others.
During and after installing areas, keep a close eye on boards that may separate. Some products
that are loosely milled will do so with ease. Keep a pry bar or wonder bar handy to close up end joints by prying carefully
off the baseboard or drywall. Kicking them back into place is also useful, only if you're wearing sneakers free of grit.
loosely milled will do so with ease. Keep a pry bar or wonder bar handy to close up end joints by prying carefully
off the baseboard or drywall. Kicking them back into place is also useful, only if you're wearing sneakers free of grit.
 Another invaluable tip is the use of wedges. Some of the better quality milled brands will make you look like a pro and won't
need this procedure.
Another invaluable tip is the use of wedges. Some of the better quality milled brands will make you look like a pro and won't
need this procedure.
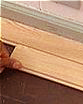
Once an area is complete, engage the wedge as shown in the image via tongue and groove. Anchor
another scrap piece just behind it and attach with a masonry nail, tapping the wedge into place. This is the most useful method
we've found for tightening up side gapping. Once everything is tight as you desire, use blue painters tape to keep it intact
and remove the wedges carefully, not affecting the exposed edges of the completed sections. These pieces can be cut on the
table saw at a preferred 30º angle.
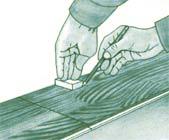
Measuring That Last Board against the Wall
 Actually there is no need for a tape measure here. Take the piece you desire to use in that area and line it up with the last
row installed (on top) Using another board, place it against the baseboard and scribe a line on the board you plan to use.
This is especially useful where walls are not straight or are bowed in and out.
Actually there is no need for a tape measure here. Take the piece you desire to use in that area and line it up with the last
row installed (on top) Using another board, place it against the baseboard and scribe a line on the board you plan to use.
This is especially useful where walls are not straight or are bowed in and out.
Depending on how straight the cut is, a table or jig saw is the power tool of choice.
Preferred Appearances
There's nothing worse that seeing a transition piece where it does not belong. Highly visible areas should be addressed to provide the best appearance. In this case marble thresholds were used at every bathroom door opening. Depending
on what may be common in your locale, these thresholds may not be used and an ordinary T-molding will work. In our example
net fitting to the threshold was appropriate.
be addressed to provide the best appearance. In this case marble thresholds were used at every bathroom door opening. Depending
on what may be common in your locale, these thresholds may not be used and an ordinary T-molding will work. In our example
net fitting to the threshold was appropriate.
Look around at other areas where this method would look more attractive. Exterior door openings are
another highly visible area. Placing quarter round or similar always looks unsightly. In some cases you can go under door
thresholds with the installation by removing and re-installing them. Careful that it's sealed to the weather conditions once
re-installed.